|
DIY Requires a Can-Do AttitudeInventing isn't for everyone. Do-it-yourself requires a can-do attitude. The circuit doesn't always work. You get your hands dirty. You have to cipher with Ohm's Law: R= (V / I). It's hard, but this page shows you the way. You can make it if you try. Prototype your amplifier on a solderless breadboard (plugboard). The circuit goes together in minutes. Changes are easy. Radio Shack and others sell such breadboards. When your invention is satisfactory, copy it to a perfboard or PC board. 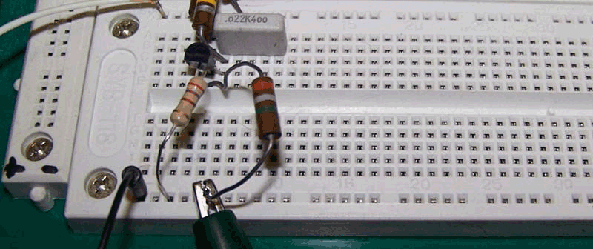
I found this breadboard on eBay. I has about 2,000 contacts. For a simple preamp, 400 to 800 contacts are enough. |

Is it love, or a new circuit? |
|
|
|
Prerequisites
|

|
|

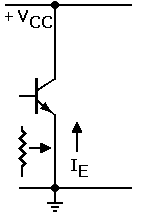
Why zero? For the answer, mouse over. Click for circuit with resistor bias. |
No-Curve Design Procedure
A—Find RE
|
 Mouse over to install RE in circuit.
|
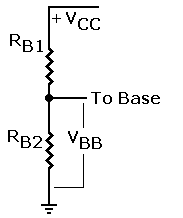
B—Bias the Transistor with VBB
|
Mouse over for resulting circuit. |
C—Complete the Amplifier
|
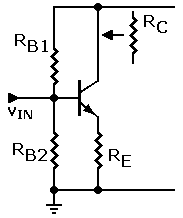
Mouse over to install RC in preamp. |
More About Amplifiers
Resistors come in standard sizes. Replace each calculated value with the nearest standard value. For example, your electronics store doesn't sell a 4,570-ohm resistor. Instead, buy the standard, 4,700-ohm part. In most cases, standard parts will be within 10 percent of your calculated values. If possible, the base-bias network should be even closer. Resistor wattage is important, too. For one-milliamp circuits, quarter-watt resistors are sufficient. Above 10 mA, switch to half-watt or larger resistors. If the resistors run warm, replace them with higher-wattage parts. In that case, also heat sink your transistor.
|
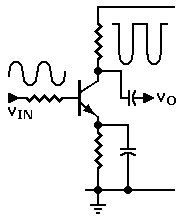
Decoupling Capacitor. To increase stage gain, you may add an emitter decoupling capacitor CE to the circuit. The costs of this capacitor are reduced stability, reduced low frequency response and gain that varies by frequency. The decoupling capacitor adds a high-pass filter to the preamplifier. For this reason, a full-band amplifier requires a very large emitter-bypass capacitor. For preamps, typical capacitor values vary between 50 µF and 1,000 µF. An amplifier with an emitter bypass capacitor can't amplify DC. If you make the bypass capacitor small, the preamplifier will only boost the high frequencies. Coupling Capacitor. To achieve sufficient voltage gain, a typical amplifier requires more than one stage. Without a redesign, you can't directly connect two stages. If you do, the collector voltage of the first stage upsets the base bias of the second stage. Engineers devised ways to eliminate this problem. The easiest method avoids redesign by inserting coupling capacitors between stages. These capacitors block out the DC from the collector and prevent it from upsetting bias. Each transistor must have both an input and an output capacitor. Typical values. A typical value of input coupling capacitor CB is 5 µF. A typical output capacitor CC is 50µF. As with decoupling capacitors, coupling capacitors add high-pass filters to your amplifier. Capacitor-coupled preamplifiers can't amplify DC or slow-changing AC signals. If the amplifier will pass low-frequency signals, only use large capacitors. For example, a bass guitar amplifier requires larger capacitors than does a banjo amplifier. Also use a capacitor after the pickup, at the input of the first amplifier stage. |
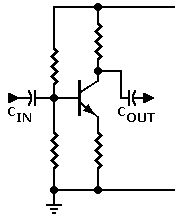
Coupling capacitors. Mouse over for CE (emitter decoupling capacitor ). |
|
Computing capacitor values. A future lesson will discuss how to select coupling capacitors for your circuit. If you'd like to experiment, use the typical values in the paragraphs above. Other Types of Amplifiers. Bias voltage is only necessary for analog circuits. A properly biased transistor can reproduce and amplify sine waves. Such sine waves make up natural sounds, such as popular or classical music. Without bias, an amplifier is possible, but the circuit will clip (distort) the sine waves. Some effect and switching circuits work without bias, because these circuits need not be faithful to the original waveform. A clipper circuit appears at right. |
Clipper circuit: Mouse over for typical part values. |